How to make your MFC (or non MFC) program support high DPI monitors. The easy way.
A few years ago Microsoft introduced support for very high resolution monitors. Such monitors might have nearly 4000 pixels horizontally and over 2000 pixels vertically. This provides wonderful scope for editing photographs and providing great graphics. But at your normal scaling the text on your displays starts looking a bit small. This is typical if you’ve specified your text height in pixels. Which from what I’ve seen is how a lot of people (most?) do it. “Oh, 14 look looks OK, I’ll go with that”. Looks fab for a 21 year. No so good for your customers over 40 though, most of them are wearing glasses, and so will you be when you get there (or contacts, you know what I mean).
This approach isn’t going to work with high DPI displays. You need to think in terms of point sizes for text, like you would if you are printing a document. Once you have an appropriate point size for your normal non-scaled (non high-DPI) display you can then just get the correct font height in pixels (based on the point size) and multiply by a scale factor to determine the correct column width for any columns in grids, or any graphics that need scaling.
Getting the scale factor
Non scaled monitors are deemed to be monitors that display at 96 DPI. From this the following table follows:
| DPI | scaling |
|---|---|
| 96 | 100% |
| 120 | 125% |
| 144 | 150% |
| 192 | 200% |
You can calculate a scale factor for the whole system, or a scale factor per monitor – if you have monitors with different display facilities. The ability to calculate a scale factor per monitor only works on Windows 8.1 and Windows 10 onwards. You can find out more about this using the GetDpiForMonitor() function. For the purposes of this discussion we will only cover getting the system scale factor.
If you are thinking of doing per-monitor scaling, you might be well served by first doing system wide scaling, because it is simpler and will introduce you to most of the problems you will face, but in an easier to manage problem space than per-monitor scaling. Stepping from a working system wide scaling to per monitor scaling should be a lot easier than going from non-scaling to per-monitor scaling in one go.
double getSystemScaleFactor()				// returns 1.0 for no scaling
{
	// some simple caching to speed things up

	static int		calculatedScale = FALSE;
	static double	scale = 0;

	if (calculatedScale)
		return scale;

	// get DPI for the system

	HDC		hdc;

	hdc = ::GetDC(NULL);

	UINT	dpiX = 96;		// default DPI

	dpiX = GetDeviceCaps(hdc, LOGPIXELSX);

	scale = (double)dpiX / 96.0;
	if (scale < 1.0)
		scale = 1.0;		// prevent funny business with super large monitors returning very low DPI values

	::ReleaseDC(NULL, hdc);

	calculatedScale = TRUE;
	return scale;
}
We also need some supporting functions that will assist us during the following phases.
- We need to be able to calculate a font point size based on a font pixel height.
- We need to be able to calculate a font pixel height based on a font point size.
Getting a font point size
Win32
#include <map>

#define FONT_HEIGHT_CACHE	std::map<double, LONG>		// point size -> pizel height
#define POINT_SIZE_CACHE	std::map<DWORD, double>		// pixel height -> point size

const int POINTS_PER_INCH		= 72;
const int DEFAULT_DOTS_PER_INCH	= 96;

// map used as a cache for various point sizes

static FONT_HEIGHT_CACHE	fontHeightCache;
static POINT_SIZE_CACHE		pointSizeCache;

double getFontPointSize(HDC   hDC,
                        DWORD pixelSize)
{
	LONG	pixPerInch = GetDeviceCaps(hDC, LOGPIXELSY);
	double	points = (pixelSize * 72.0) / pixPerInch;

	return points;
}

double getFontPointSizeForDefaultDC(DWORD	pixelSize)		// returns font height for the appropriate screen
{
	POINT_SIZE_CACHE::iterator	iter;
	double				points;

	iter = pointSizeCache.find(pixelSize);
	if (iter == pointSizeCache.end())
	{
		// we don't know the point size, calculate it

		HDC		hdc;

		hdc = ::GetDC(NULL);
		points = getFontPointSize(hdc, pixelSize);
		::ReleaseDC(NULL, hdc);

		// store the point size in the cache

		pointSizeCache[pixelSize] = points;
	}
	else
	{
		// look in the cache for the point size

		points = iter->second; //lint !e64
	}

	return points;
}
MFC
double getFontPointSize(CDC   *dc,
                        DWORD pixelSize)
{
	if (dc == NULL)
	{
		return getFontPointSizeForDefaultDC(pixelSize);
	}
	else
	{
		return getFontPointSize(dc->GetSafeHdc(), pixelSize);
	}
}
Getting a font pixel height
LONG getFontHeightForDefaultDC(double	pointSize)		// returns font height for the appropriate screen
{
	// this function can be optimized by using a simple cache on the point size (worth it in some situations!)

	HDC		hdc;

	hdc = ::GetDC(NULL);
	height = getFontHeight(hdc, pointSize);
	::ReleaseDC(NULL, hdc);
}
LONG getFontHeight(HDC    hDC,
                   double pointSize)            // returns font height for the appropriate screen
{
	LONG	pixPerInch = GetDeviceCaps(hDC, LOGPIXELSY);
	LONG	lfHeight = (LONG)((pointSize * (double)pixPerInch) / 72.0);

	return lfHeight;
}
LONG getFontHeight(CDC    *dc,                  // can be NULL for default screen
                   double pointSize)            // returns font height for the appropriate screen
{
	if (dc == NULL)
	{
		return getFontHeightForDefaultDC(pointSize);
	}
	else
	{
		return getFontHeight(dc->GetSafeHdc(), pointSize);
	}
}
Updating your code
Versions of MFC since Visual Studio 2010 support MFC scaling, although nothing happens by default. You still have to supply the scale factor for the fonts in use. These fonts will mainly be for any text drawn on graphics displays and for any owner drawn controls such as lists and grid controls which sit on top of huge amounts of data that can’t be reliably stored inside the control. You need to find the places where you create fonts and set the font height. Often this will be when you create a font or when you set the lfHeight member of a LOGFONT structure. Once we have these locations we can update the code.
The sequence of operations to update your code is as follows:
- You need to find each location where a font height is set.
- For each location you need to calculate the point height and replace the integer height with a call to calculate a height based on a point height.
- For each location verify that the calculated height is correct for a non-scaled display.
- For each location verify that the font now scales with the display.
Because the new height calculated by getFontHeight() is based on a point size we don’t need to worry about scaling the returned value with getSystemScaleFactor(), the point size is relative to how we view the display, so is automatically the correct scale.
CreateFont
Search for uses of the MFC method CFont::CreateFont(), or the Win32 function ::CreateFont(). The first parameter is the height of the font.
#define FONT_SIZE		16

...

font.CreateFont(FONT_SIZE,              // default height
                0,                      // default width
                0,
                0,
                FW_NORMAL,
                FALSE,
                FALSE,
                FALSE,
                DEFAULT_CHARSET,
                OUT_TT_PRECIS,
                CLIP_DEFAULT_PRECIS,
                PROOF_QUALITY,
                FF_DONTCARE,
                _T("Arial"));
We need to know what point size of the specified font equates to our chosen (above) font height of 16 pixels. The font height may change according to the font face, italics, weight etc. So you do need to check this for each one and not just rely on it being what you think it is. This is why I haven’t provided a table of values for you to plug in.
We can calculate the font point size using the following code, passing in the device context of the appropriate display.
double testPointSize;

testPointSize = getFontPointSize(hDC, FONT_SIZE);
Just add the code before the call to CreateFont, build it, put a breakpoint there and when it stops in the debugger make a note of the value testPointSize. In our tests, a point size of 11.0 gave us a pixel height of 16 (FONT_SIZE).
Once we know testPointSize we can update the code, as shown below. We notated our code with info about how it was tested to help anyone that ends up at this code wondering why these sizes are used. People won’t always search the version history and disk space is cheap. Comments help. Use them.
LONG	lfHeight;

lfHeight = getFontHeight(GetDC(), 11.0);		// aiming for lfHeight == 16 (at "small" 1920x1080);

// set font for tab control

font.CreateFont(lfHeight,               // default height (used to be hard coded at 16)
                0,                      // default width
                0,
                0,
                FW_NORMAL,
                FALSE,
                FALSE,
                FALSE,
                DEFAULT_CHARSET,
                OUT_TT_PRECIS,
                CLIP_DEFAULT_PRECIS,
                PROOF_QUALITY,
                FF_DONTCARE,
                _T("Arial"));
If the above font is going to be created many times, caching the value of getSystemScaleFactor() and/or caching the fonts created will be a good idea.
CreateFontIndirect
Search for uses of the MFC method CFont::CreateFontIndirect(), or the Win32 function ::CreateFontIndirect(). With this usage you are interested in the lfHeight value of the LOGFONT structure passed to CreateFontIndirect. The procedure is identical as for CreateFont() described above.
Before scaling:
pDispInfo->item.lfFont.lfWeight = FW_NORMAL;
pDispInfo->item.lfFont.lfHeight = -11;
After scaling:
pDispInfo->item.lfFont.lfWeight = FW_NORMAL;
pDispInfo->item.lfFont.lfHeight = -getFontHeightForDefaultDC(8.5);		// aiming for lfHeight == -11 (at "small" 1920x1080);
Alternative implementation
Ignore point sizes and just multiply your existing font pixel heights by getSystemScaleFactor(). This is less work to implement, but results in lots of calls to getSystemScaleFactor() throughout your code base. If you eventually decide to implement per-monitor scaling I think you will regret choosing this implementation method.
pDispInfo->item.lfFont.lfWeight = FW_NORMAL;
pDispInfo->item.lfFont.lfHeight = -11 * getSystemScaleFactor();
Setting column widths
If you are setting column widths in a grid control you’ll need to scale these appropriately.
Before scaling:
m_Grid.SetColumnWidth(0, 200);
m_Grid.SetColumnWidth(1, 400);
After scaling:
 double scaleFactor;

scaleFactor = getSystemScaleFactor();
m_Grid.SetColumnWidth(0, (UINT)(200 * scaleFactor));
m_Grid.SetColumnWidth(1, (UINT)(400 * scaleFactor));
Implementation note: For per-monitor scaling you’ll need to update these calls to get the scale factor for the appropriate monitor.
How to test
To test you don’t need to purchase a high DPI monitor. Although if you do have a high DPI monitor you will be more aware of the issues your high DPI using users have.
- Change the text scaling size from 100% to another value.
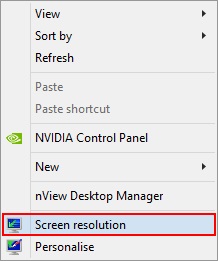
- Right click on the Windows desktop.
- Choose Screen Resolution from the context menu.
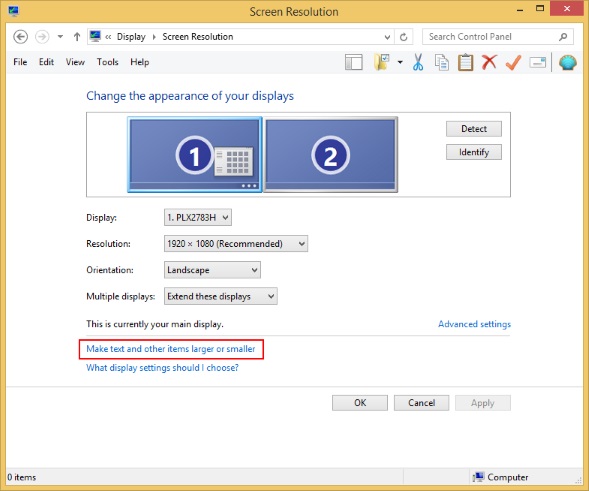
- Click the link Make text and other items larger or smaller.
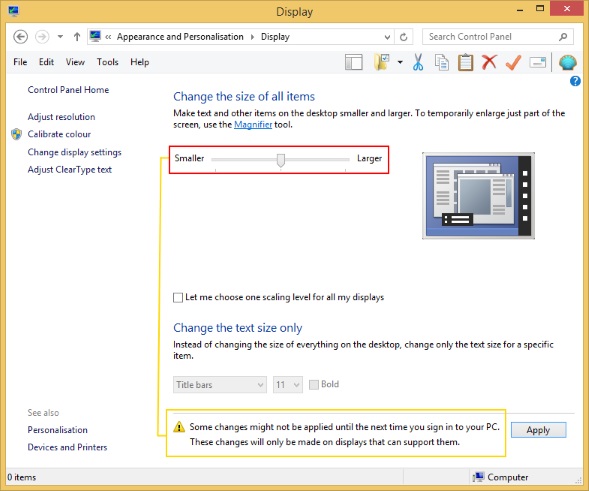
- Change the text size slider larger or smaller as appropriate. Notice that as you change it a warning notice is displayed about different scaling results. Click Apply. Now close the dialog box.
When you click Apply you should notice the text and graphics scale up or down in relation to the choice you made. “Aha! I’ve done it!” you think. Not so fast. This is just Windows pretending everything is OK. You’ll notice some of the items that have been scaled up don’t look so perfect, a bit blurry. This is because this is Windows virtualising the scaling. This also means that many of the fonts you need to change will have been automatically changed for you – for this session only! Don’t let this fool you into thinking your job is done. If you want to see what they’ll look like for your customers you need to log out and then log back in. You don’t need to shutdown the computer or reboot it. Just log out and then log in (not lock the screen and log in!).
When you log in, start your application. Now look at the text you are updating to be responsive to scaling. Has it scaled? Yes? Great! No? You must have missed something. Failed to update it to work from point sizes? Columns too narrow? Forgot to add the multiply by scaling factor? Debug as necessary. Just add developer.
When you’ve got this working, you’re going to have to go back to normal font size (same procedure as before, but just move the text slider all the way to the left), then log out and log in. Now do your tests for the next font. Rinse and repeat. You are going to be logging out and logging back in a lot during this work. Or purchase a modern laptop with a QHD screen or a nice QHD monitor (or better!).
Optimisations and improvements
Namespaces.
We’ve placed all the helper functions I described in their own namespace to separate them from the rest of the code.
Caching.
We’ve also used some caches to improve the query time of some requests. We didn’t find this bothersome until we had a grid with a lot of items (about a million) that wanted to do a specific query. We thought the delay was unacceptable. Adding a cache fixed that quite simply.
Per Monitor DPI.
You could look into supporting different DPI values for each monitor. See the GetDpiForMonitor() link we mentioned earlier in the article.
Icons.
You may also need to scale icons (in toolbars etc) accordingly. In practice we haven’t found this to be a huge problem so long as your non-scaled icons are reasonably large. Ideally you could scale your icons, but we’ve found scaling icons to be the least important thing for users of our software. What they really want is legible text, hence our focus on that in this article.
X and Y scaling.
If you’ve been paying attention you’ve noticed that getSystemScaleFactor() returns the horizontal scale factor. We’ve used this everywhere, for both scaling of font heights (vertical) and scaling of column widths (horizontal). You could choose to calculate a vertical scale factor and use that for the scaling of font heights.
The vertical scale factor should be the same (barring any hardware restrictions) to the horizontal scale factor in order to preserve image integrity – so we haven’t bothered to calculate a vertical scaling factor. In practice we’ve been happy with the results returned from using one scale factor.
Conclusion
Now you know everything you need to know to get your Win32 or MFC program displaying well on high DPI displays. There’s a lot of great information about this on the web, but reading it can make it seem quite daunting, when in actual fact it’s very straight forward. We recommend changing one font at a time, then test, then check with a scaled display, then move on to the next font. Don’t try to do them all at once.
If you’re testing without a high DPI display, once you think it’s all good to go, show it to some of your customers that have high DPI displays that have been bending your ear about supporting high DPI displays. They’ll be pleased to tell you what isn’t quite right. Across all our applications, we missed on thing that a customer spotted.
I’d also like to extend a big Thank You to Anna Jayne Metcalfe at Riverblade for some helpful pointers when we started this work. Riverblade make the excellent Visual Lint static analysis tool analyser, an excellent complement to our dynamic analysis tools.
Further Reading
Writing Win32 applications and high DPI.
MFC applications default to being DPI aware.
Getting the DPI per Monitor.
Getting the Logical Monitor Width.
High DPI Tutorial.